Thankful For Tech Tools to Make Accessibility Relatively Easy!
Some great Tech Tools (free) to help you make great accessible videos and materials for students.
Captions on videos tend to be the toughest thing needed to make materials accessible, but not the only thing needed. When using pictures they need good descriptions for people who use screen readers. While I am guilty of both mistakes, I am working on improving my materials.
Let’s start with captions for videos. Use your favorite video tool. I have been using Screencast-o-matic lately and uploading the videos to my YouTube account. You can add the captions to your video before you save or after you upload to YouTube. I actually wait until I upload for a couple of reasons, the main one being I don’t type my script ahead of time, something always changes when I am ‘filming’. I also don’t go through and type what I said afterwards.
There are 2 ways to get the captions. Let YouTube handle it for you and hope it does a good job. The other option is to use the Google Docs > voice typing tool. However, I found out anytime you click something it stops recording which makes using it while making videos time consuming and frustrating. So instead of trying to do it while making the video, I use the Voice Recorder built into my Windows 10 OS, just scroll to the bottom of the programs. I am sure Apple products have something similar…
Anyway, after I have the video with voice recorded, I now have 2 files. When you have time, you then have Google Docs convert it to text. Keep in mind not to use the computer while you are running it, Google Docs gets confused. I don’t have a separate mic & speaker, so I slipped the mic from my headset into the opposite earpiece and it worked! I can then go through and listen to the recording or the video and make sure it converted correctly, Google voice doesn’t always get it right, so check. I know other people have had worse problems with the auto-captions through YouTube.
In YouTube in the Video Manager, you can add the captions as a text file and it will time it with your recording. While these do take time, it saves brain power for more important things, like cleaning the house…
When describing where to find items on the screen, make sure you are specific. I catch myself saying things like, here, there, etc., these terms are not helpful for people who can’t see where you are pointing. Be descriptive, bottom left, middle right, etc. …
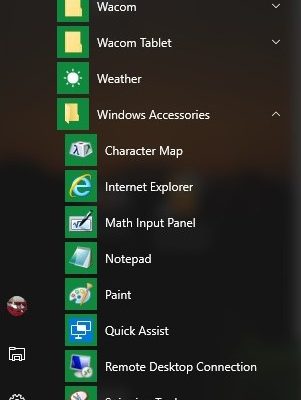
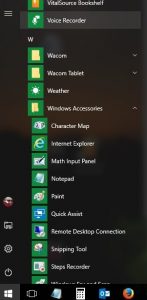
Two more tech tools that are helpful for making materials for students are the Snipping Tool & the Steps Recorder. Again these tools are found in Windows 10, although I am sure some of these are in earlier versions, and Apple probably has similar items.
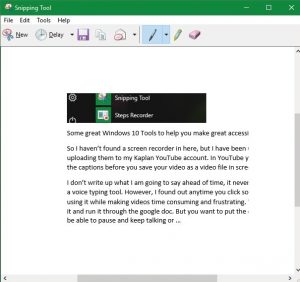
The Snipping Tool allows you to take a quick screen shot, scribble on it, or only a part of a screen, less cropping and some good options. Of course I couldn’t use it to snip it, but it does make a great way to get quick screen shots to students without worrying too much about what else is on your screen.
The Steps Recorder will take screen shots & ‘write out’ the steps you took to do something.
There are more steps showing how to get to the Steps Recorder…
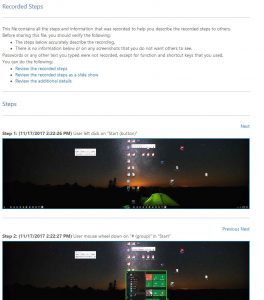
You can also edit the file and all sorts of other helpful things. I did not edit the pictures, but combined with the Snipping Tool, Voice Recorder, and a screen recorder you have a great toolkit for helping students and keeping the content accessible!
If you have questions, a request, or what have you, please let me know!
Dr. Tammy